• Skip to primary navigation
  • Skip to main content
  • Skip to primary sidebar

P.S. I Love You Crafts

Scrapbooking, Card Making, Cricut Projects, and Crafts

  • Handmade Cards
  • Cricut
  • Scrapbook Layouts
  • Crafts
  • Shop – Craft Stores
  • Events
  • ABOUT ME

cards

Cricut Wedding Invitation or Card

October 12, 2017 by Pam Larmore 1 Comment


Wouldn’t this make a gorgeous Cricut Wedding Invitation?  I made this wedding card for a great couple on their wedding day,  but it would also be a gorgeous invitation.

We haven’t been to a wedding in 2 years, but on this day, we were invited to two weddings.  I wanted to design something special for the newly married couples.  Here’s one of my creations.


Make a stunning Cricut Wedding Invitation or Card using the Cricut Explore or the Cricut Maker and the Simple Everyday Cards Cricut Cartridge. I added other elements to make this elegant wedding card.

…

Read More

Easy Cricut Thank You Card

September 15, 2017 by Pam Larmore 1 Comment

It always seems like I need a Thank You card.  I have so many kind people in my life, and I don’t want their thoughtfulness to go unnoticed.

This Cricut Thank You Card is easy enough that you can make a whole stack in an evening.  The classic style could also be used for Sympathy, Birthday, or Get Well.  Imagine making a stash of these and being prepared during all of the fall months.


Make an easy Cricut Thank You Card using the Cricut Expression or the Cricut Explore. This is a great card, using a sketch from Clean and Simple Stamping.

…

Read More

Free Cupcake Printable Birthday Card

August 24, 2017 by Pam Larmore 1 Comment

Everyone knows how much I love making handmade cards, but sometimes I run out of time.  I just can’t bring myself to BUY a card.  Everyone knows that I spend hours in my craft room, and they expect cards from me to be hand crafted.


…

Read More

Handmade Butterfly Birthday Card

July 21, 2017 by Pam Larmore 20 Comments

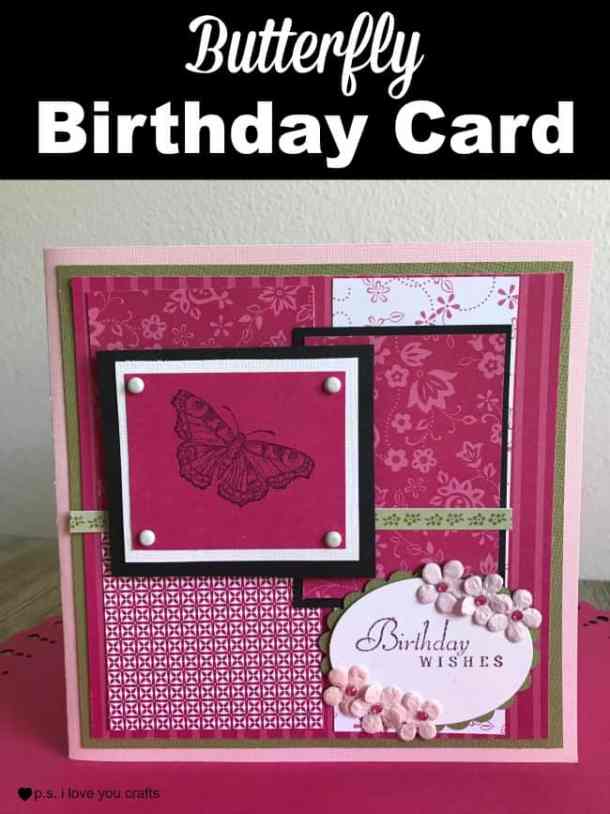
I rarely make 6×6 cards, but I should!  I made this butterfly birthday card using a sketch from Simon Says Stamp.  Since I wanted to have many layers,  I knew I was going to need a bigger card.


Make a stunning butterfly birthday card using hot pink and black paper, a butterfly rubberstamp, and a birthday stamp.


…

Read More

Moo-chas Gracias Cow Cricut Card Using Create A Critter

July 13, 2017 by Pam Larmore 2 Comments

Moochas Gracias for visiting my Blog today!

This cute Cricut Cow will surely make someone smile. This lonely little cow has been sitting on my work table for awhile.

Make a Cricut Cow Card using the Create A Critter Cricut Cartridge, a stamp from My Pink Stamper and some border punches.


Sometimes when I’m working on a project, I’ll cut out an extra of something in case I make a mistake or in case I need an extra.  I hate having leftover pieces parts of projects sitting everywhere, but I always end up with them on my work table.  I found a fun way to use this Cricut Cow though.

The patterned paper is from a 6×6 stack from Stampin’ Up.  I got it as a hostess gift for holding a workshop.  There are five colors in the stack, and each color has 8 different patterns.

I love being able to mix and match patterns on my cards.  It makes designing them really easy.


Paper Sizes For Cricut Cow Card:

  • Card base – White 8 1/2″ x 5 1/2″ (folded in half)
  • Mat – Black 5 1/4″ x 4″
  • Pink Patterned Papers – 5″ x 2″ (There are two different papers.  They overlap slightly so you can see the black mat.  Make sure you tie your ribbon around the printed card stock and mat before attaching them to your card.  This will keep you from seeing the ribbon on the inside of the card.
  • 5″ strip of black card stock.  If your punch is deeper, you might need a wider piece.  The bug border is an old punch from Martha Stewart, but I love it.  The thin scalloped punch is by Stampin’ Up.

You can see that I put pop dots under the cow to give the card more dimension.

The Moo-chas Gracias is from My Pink Stamper. The Cricut cow is from the Create A Critter Cricut Cartridge.  That cartridge has so many awesome animals on it.

For more projects using this Cricut Cartridge, visit Create A Critter Cricut Cartridge Projects.

Make a Cricut Cow Card using the Create A Critter Cricut Cartridge, a stamp from My Pink Stamper and some border punches.


Here’s a Cricut Pop Up Card that you might like.  It has the cute cow, tree, flowers, and two ducks.  Linda’s Works of Art has a great card using this cow too.


Stair Step Card that fits into and A2 size envelope decorated with patterned paper and Cricut die cuts.

  • Learn to Make Handmade Cards by P.S. I Love You Crafts
  • Handmade Christmas Card Ideas by P.S. I Love You Crafts
  • Cricut Birthday Cards by P.S. I Love You Crafts
  • Harry Potter Cricut Card by P.S. I Love You Crafts
  • Mario Brothers Cricut Card by P.S. I Love You Crafts


Harry Potter Cricut Card

July 5, 2017 by Pam Larmore 5 Comments

I had a special request for a Harry Potter Card.  I really wanted to make it using my Cricut Explore, but I wasn’t sure if it was going to be possible.

I used the Paper Doll Cricut Cartridges to make a Mario Brothers Card a few weeks ago.   They turned out really cute, so I thought I might be able to do something similar to make a Harry Potter Cricut Card.

Use the Cricut Explore to make a Harry Potter Cricut Card. I used the Paper Doll Cricut Cartridges and a few extras. I love how he turned out!

This post contains affiliate links. If you make a purchase I will receive a commission at no additional cost to you.

I started in Cricut Design Space by searching Harry Potter.  There wasn’t a complete Harry Potter, but I did find these adorable glasses that were perfect.  I had to tweak the a little bit, but I think they came out great.

I looked all of the dolls on Paper Doll Dress Up and Everyday Paper Dolls to see if any of them were dressed similar to Harry Potter and to see if one of them had similar hair.

I found the long robe on one of the Three Wise Men, and a little boy’s hair that would work.  I cut a snowboarders scarf yellow and added the red stripes with a Sharpie Marker.


I really like designing cards in Cricut Design Space.  I was able to size all of the pieces quickly and easy and only had to cut them once.  All of the shapes that I used were free with my Cricut Access Subscription.

I wanted a castle behind Harry Potter, but the one in Design Space was too wide.  I used a square and the slice feature to cut part of it off.

You’ll notice that I changed the placement of the owl when I assembled the card.  It didn’t look right in the upper left corner, so I trimmed it down and made him looking out the door.


Here are all of the pieces after I got them cut.  I used a Zig Glue Pen to assemble most of the pieces, since they are small.  I added green cardstock behind his head, so he would have pretty green eyes.

I used a silver metallic Sharpie to add a handle to his magic wand.  I really love those metallic Sharpies. I know I’m going to find other projects for them soon.


Use the Cricut Explore to make a Harry Potter Cricut Card. I used the Paper Doll Cricut Cartridges and a few extras. I love how he turned out!


I added small pieces of cream cardstock to put behind the windows and door on the castle.

I put dimensional tape behind Harry Potter and the stars to give it some dimension.  Then I added clear Stickles glitter glue to the stars.


Use the Cricut Explore to make a Harry Potter Cricut Card. I used the Paper Doll Cricut Cartridges and a few extras. I love how he turned out!


I thought the owl needed some shiny eyes, so I added bright yellow to him.  I thought about do gold or red glitter eyes, but I was afraid I would mess him up.


Use the Cricut Explore to make a Harry Potter Cricut Card. I used the Paper Doll Cricut Cartridges and a few extras. I love how he turned out!


The card was a special order, and when I was delivering it, I noticed that I didn’t put any shoes on him.  He definitely needs some shoes.

Have you used the Paper Doll Cricut Cartridges to make any other characters?  I’d love to see them.

  • Mario Brothers Cricut Card by P.S. I Love You Crafts
  • Handmade Christmas Cards by P.S. I Love You Crafts
  • Cricut Birthday Cards by P.S. I Love You Crafts
  • How to Make Handmade Cards by P.S. I Love You Crafts
  • Make a Stair Step Card by P.S. I Love You Crafts


Sunflower Card with Simply Stamps

June 12, 2017 by Pam Larmore 2 Comments

I’m so fortunate to only have a 7 minute commute to work, all on back roads.  I have some of the most beautiful Maryland scenery to enjoy to and from work every day.   I often see bald eagles, momma deer with their fawns, and fields of sunflowers.

In honor of the sunflowers that will soon be in full bloom, I have a Sunflower Card using a stamp from Simply Stamps.


Make a Sunflower Card using a rubberstamp from Simply Stamps. It's an easy card that will only need a few supplies.


This post is sponsored by Simply Stamps. All opinions are my own.

Since I’m in Maryland, this stamp could also pass as a black eyed Susan, which is our state flower.   I also colored it pink and made a beautiful daisy card a few months back.  What a versatile stamp.


Supplies Needed for Sunflower Card:

    • 5 1/2” x 11” Yellow card stock
    • 5” x 5” Green card stock
    • 4 ¾” x 4 3/4” Sunflower patterned paper
    • Fancy Circle cut from yellow card stock – I used a Spellbinders Die to cut my
    • 2 ¼” x 3 ½” White card stock
    • 2 ½” x 3 ¾” green cardstock
    • Sunflower Stamp by Simply Stamps
    • Black Ink
    • Copic Markers
    • Corner punch
    • Green Rhinestones
    • Green ribbon
    • Green and clear glitter glue
    • Scrapbook Adhesive
    • Foam dots


Make a Sunflower Card using a rubberstamp from Simply Stamps. It's an easy card that will only need a few supplies.

Instructions:

  1. Fold the yellow cardstock in half to create the card base.
  2. Use the corner punch to punch fancy corners in the white cardstock, green cardstock, and sunflower patterned paper.
  3. Stamp the sunflower on the white card stock in black ink. Color with Copic Markers
  4. Attach the white cardstock to the green mat.
  5. Attach the sunflower paper to the green mat and attach to the card base.
  6. Attach the fancy circle to the center of the sunflower paper.
  7. Wrap the green ribbon around the layers with the sunflower paper and tie into a bow to the left side of the card.
  8. Use foam tape to attach the sunflower to the card.
  9. Add three green rhinestones to the left of the sunflower.
  10. Add clear glitter glue to the flower and green glitter glue to the leaves and stem.


Make a Sunflower Card using a rubberstamp from Simply Stamps. It's an easy card that will only need a few supplies.

Looking for more card ideas?  Here are some great resources.

  • All Free Paper Crafts has pages and pages of handmade cards.
  • Learn to Make Handmade Cards by P.S. I Love You Crafts
  • Handmade Christmas Cards by P.S. I Love You Crafts
  • How to Use Rubberstamps by P.S. I Love You Crafts
  • Cricut Birthday Cards by P.S. I Love You Crafts


Make a Mario Brothers Cricut Card

June 4, 2017 by Pam Larmore 7 Comments

With lots of imagination and a little creativity, there’s nothing you can’t make with the Cricut Explore.

I had a special request for a Mario Brothers Card.  First let me say…I know NOTHING about Mario Brothers other than it’s a video game.  I might have been able to pick Marie and Luigi out of a line up, but I’m not 100% sure about that either.


Make a Mario Brothers Cricut Card using the Cricut Explore. Thank you Ken's Kreations for the inspiration for this card. Ken used the Everyday Paper Dolls and Paper Doll Dress Up Cricut Cartridges to create Mario and Luigi from the popular Super Mario video game.


This post contains affiliate links.  If you make a purchase after clicking one of these links, I will receive a commission at no additional cost to you.


I made this fun Cricut Card for the Bling on the Sun Hop.  The kids will be out of school soon if they’re not out already in your area.  They will be playing lots of video games both at home and in the arcades, while on vacation.

After looking at my project, I hope you’ll take a look at the other great Summer Bling projects that are listed at the bottom of this post.


I started researching on Google to get some ideas.  I was pretty sure I could create the Mario Brothers using the Cricut, but I wasn’t exactly sure how to make them look authentic.

I found an awesome Mario Bros. Cricut Card made by Ken’s Kreations in the Cricut Project Center.  I was able to track down the blog post on Ken’s Kreations website to find out which Cricut Cartridges he used.  This was super helpful information.


Ken made his card using the Cricut Expression Machine, but I’m fortunate to be able to use the Cricut Explore to make this Super Mario Card.  The Explore makes it really easy to get sizes correct when making projects.

I used the Everyday Paper Dolls Cricut Cartridge to make this Racecar Card while back.  It’s great for making all kinds of people.

I started with the train conductor on the Everyday Paper Dolls Cricut Cartridge.  By using the ungroup feature, I can delete the parts that I didn’t need like the lantern and railroad crossing sign.

The gloves are from the snowboarder on the Everyday Paper Dolls Cartridge, and the mustaches are from one of the three wise men on the Paper Doll Dress Up Cricut Cartridge.  I found the star, by doing a search.  It was available with my Cricut Access Subscription.


I added a tiny circle to the hats for the initials. Since the initials were so tiny, I hand wrote them in marker.

I also added circles for the eyes and noses.  I wanted the eyes to be a little bigger than they cut.  I used thin tipped markers to add details to them.


Here are all of the pieces, some of which are teeny tiny.  Luigi is 1/4″ taller than Mario, so I had to make sure to keep the pieces separated.

The bald, naked dolls make me laugh!


Make a Mario Brothers Cricut Card using the Cricut Explore. Thank you Ken's Kreations for the inspiration for this card. Ken used the Everyday Paper Dolls and Paper Doll Dress Up Cricut Cartridges to create Mario and Luigi from the popular Super Mario video game.


Using a black Micron pen, I added a dotted and dashed border to the star.  Mario and Luigi needed hair, so I also added that with a the Micron pen.

When I assembled the brothers, I didn’t attach their hat brims. Instead, I folded them up to add a little extra dimension to them.

Notice the tiny button brads that I added to their overalls.  I knew they were in my stash and waiting for just the right project.

This was a special request baby card.  Since my handwriting isn’t very good, my Mom wrote, “Welcome Gracin” on the star for me.

The red glitter stars came in a mixed package from Walmart, and they were the perfect size.


Make a Mario Brothers Cricut Card using the Cricut Explore. Thank you Ken's Kreations for the inspiration for this card. Ken used the Everyday Paper Dolls and Paper Doll Dress Up Cricut Cartridges to create Mario and Luigi from the popular Super Mario video game.

Mario Brothers Cricut Card Paper Sizes

  • Card base is 5 1/2″ x 11″ folded in half.
  • Black mat is 5 1/4″ x 5 1/4″.
  • Red star paper is 4 1/4″ x 3″.
  • Blue and red argyle paper is 2 1/4″ x 1 1/2″.
  • Mario is 3 3/4″ high.
  • Luigi is 4″ high.
  • Yellow star is 3″ high.

There you have it!  Even though I’m not a Super Mario fan, this was a super fun project that I soon fell in love with.  Thank you Ken’s Kreations for the great inspiration.

My next challenge is a Harry Potter themed card.  Wish me luck!  FaveCrafts has pages and pages of wonderful card to inspire you.

Here are the other talented ladies joining in on the Bling on the Sun Blog Hop.


An InLinkz Link-up


  • Harry Potter Cricut Card by P.S. I Love You Crafts
  • Learn to Make Handmade Cards by P.S. I Love You Crafts
  • Sesame Street Birthday Cards by P.S. I Love You Crafts
  • Handmade Christmas Card Ideas by P.S. I Love You Crafts
  • How To Use Rubber Stamps by P.S. I Love You Crafts

Graduation Card Using the Cricut Explore

May 25, 2017 by Pam Larmore Leave a Comment

Have you tried the new Cricut Design Space Beta?  I’ve only been using it for a few days, but I’m loving it already.   I thought the original Cricut Design Space was pretty good, but the Beta version seems to run more smoothly.

Here’s how I designed the Graduation Card using the new Cricut Design Space Beta.  You will notice that the screen looks a little different than it used to.  Everything is still there, but it’s more accessibl, making everything easier to find.

This post contains affiliate links. If you make a purchase after clicking one of these links, I will receive a commission.


Make a fantastic graduation card using the Cricut Explore. I will show you step by step how I used the new Cricut Design Space Beta version to make this great card.

…

Read More

Patriotic Party Decorations With Simply Stamps

May 12, 2017 by Pam Larmore Leave a Comment

Summer cookouts are a wonderful time to celebrate your love for America. There’s nothing better than a three day weekend to show your patriotism.  Here are some ides for adding a bit of red, white, and blue to your next patriotic party.

These patriotic party decorations are made from paper and a rubber stamp from Simply Stamps. It says Freedom iIs Not Free. There's a napking ring, card or invitation, and a pennant to to celebrate Fourth of July, Veteran's Day, Memorial Day, or Patriot's Day.


Thank You Simply Stamps for sponsoring this post. All opinions are my own.

Supplies Needed for Patriotic Party Decorations

• Freedom is Not Free Stamp
• Navy Craft Ink
• Red Cardstock
• Navy Cardstock
• White Cardstock
• Patriotic Printed Scrapbook Paper
• Silver Stickles Glitter Glue
• Scrapbook Adhesive
• Scissors or paper trimmer


These patriotic party decorations are made from paper and a rubber stamp from Simply Stamps. It says Freedom iIs Not Free. There's a napking ring, card or invitation, and a pennant to to celebrate Fourth of July, Veteran's Day, Memorial Day, or Patriot's Day.

Instructions

  1. Stamp the Freedom Is Not Free on white cardstock using navy ink.
  2. Using scissors or a paper trimmer, cut out your stamped image.
  3. Cut a piece of red cardstock slightly bigger than your stamped image to make a mat. Attach them with scrapbook adhesive.
  4. Use Navy cardstock and Patriotic patterned paper to create a pennant or flag. These can be any size, depending on how you’re going to use them.
  5. Add silver glitter glue accents.
  6. Attach your pennant to a popsicle stick, dowel, or skewer.


These patriotic party decorations are made from paper and a rubber stamp from Simply Stamps. It says Freedom iIs Not Free. There's a napking ring, card or invitation, and a pennant to to celebrate Fourth of July, Veteran's Day, Memorial Day, or Patriot's Day.
You can use this great patriotic stamp to make BBQ invitations, bands for your napkins, pennants to go in your condiments, and tents marking the food. Use your imagination and a few craft supplies to create a memorable cook out theme.


These patriotic party decorations are made from paper and a rubber stamp from Simply Stamps. It says Freedom iIs Not Free. There's a napking ring, card or invitation, and a pennant to to celebrate Fourth of July, Veteran's Day, Memorial Day, or Patriot's Day.


To make the band for the plastic utensils,  neatly fold a white napkin around the plastic ware.  Then cut a 6″ x 2″ strip of navy cardstock.  Add a piece of  5″ x 1 3/4″ star patterned paper on top.

Wrap the papers around the utensils and adhere in the back with a glue dot.  Crease the paper on the sides, so it lays flat.  Using Pop Dots, add the Freedom Is Not Free.  Trim the white cardstock in silver glitter and set it aside to dry.


These patriotic party decorations are made from paper and a rubber stamp from Simply Stamps. It says Freedom iIs Not Free. There's a napking ring, card or invitation, and a pennant to to celebrate Fourth of July, Veteran's Day, Memorial Day, or Patriot's Day.


If you’re making lots of these, it’s easiest to make them in batches.  Do all of the cutting at one time, then the stamping, etc.


These patriotic party decorations are made from paper and a rubber stamp from Simply Stamps. It says Freedom iIs Not Free. There's a napking ring, card or invitation, and a pennant to to celebrate Fourth of July, Veteran's Day, Memorial Day, or Patriot's Day.


I also made a Patriotic Invitation perfect for a backyard barbecue, or military Welcome Home Party.

Here are the paper measurements:

  • 8 1/2″ x 5 1/2″ White card stock for card base
  • 5 1/4″ x 4″ Navy card stock for mat
  • 5″ x 3 3/4″ Red card stock for background.  I use the Cuttlebug to add the embossed background.
  • 3″ Navy star cut from the Cricut. I added the embossing with the Swiss Dots Cuttlebug Folder.


These patriotic party decorations are made from paper and a rubber stamp from Simply Stamps. It says Freedom iIs Not Free. There's a napking ring, card or invitation, and a pennant to to celebrate Fourth of July, Veteran's Day, Memorial Day, or Patriot's Day.


If you’re new to card making, How To Make Handmade Cards will help you get started.

I hope you will try these easy patriotic decorations for your Independence Day cook out this summer. There are so many other times throughout the year that we can celebrate being Americans. Memorial Day, Flag Day, Patriot’s Day, and Veteran’s Day are all great occasions for making patriotic crafts.


  • « Go to Previous Page
  • Go to page 1
  • Go to page 2
  • Go to page 3
  • Go to page 4
  • Interim pages omitted …
  • Go to page 17
  • Go to Next Page »

Primary Sidebar

  • Facebook
  • Twitter
  • Pinterest
  • Instagram
  • RSS

Welcome Crafty People!

I'm Pam, and I love everything crafty. My philosophy is that every project can be improved by adding a little glitter. I love making cards, scrapbooking, Chirping with my Cricut, and Kids Crafts. Follow me to see where my next adventure leads. Now, go find something crafty to make!

Amazon Disclosure

We are a participant in the Amazon Services LLC Associates Program, an affiliate advertising program designed to provide a means for us to earn fees by linking to Amazon.com and affiliated sites.

Copyright © 2026 · Foodie Pro & The Genesis Framework